12 April 2022

14 February 2019

Fish Ball - Home Made

Traditional fish paste is made with minimal ingredients. To sum up the process, you are scraping all the meat from a fish (or fishes) and pounding it until it reaches the right consistency. There is a lot of technique to the pounding part (I still need a lot of practice). You’ve got to do it for the right amount of time to achieve the perfect fish balls with that “bouncy”, “springy” consistency. Here is my recipe and the results of my first attempt. This was also my first time gutting a fish…which wasn’t as gory as I thought it would be. I saved the heads, tails and bones and made a delicious fish broth for grandmother by simply boiling in water with some ginger and onions.

IMG_8723

Get ready to slam that fish paste! A great way to de-stress and release some tension!

Traditional Chinese Fish Ball Recipe
*A wooden cutting board may absorb the smell of the fishl and take longer to clean, use a plastic cutting board for less fishiness. (I was smelling fish for a few days…)
Also, you may want to work over newspaper to avoid fish bits getting everywhere.

Ingredients
  • 2 whole Spanish mackerels, about 1 pound each **I have seen others use different fish, you can try this with any white fish. If you really don’t want to use a whole fish you could try this with just fillets as well. You can also cut this recipe in half if you want to try with just one small fish.
  • 1 teaspoon salt (or to taste)
  • 1/2 teaspoon ground white pepper (or to taste)
  • 1 tablespoon cornstarch
  • Water


1. Clean your fish. Spanish mackerel has no scales which made it easy for me. Ask the fish monger to de-scale your fish if you have chosen to use a fish with scales. Make a slit along the belly from the fish’s rectum up to where the head begins. Remove all the innards and discard. It’s really quite simple. Rinse the fish in cold water, dry and place on cutting board. Use a plastic cutting board if you don’t want to stink up your wooden one!


2. Remove fish head(s). Simply chop the heads off. Discard, or save if you want to use them to make broth.


3. Filet the fish. Slice the meat off the fish along the bones from the tail forwards towards the head using a sharp knife. Repeat on the other side as well. (2 filets per fish.)


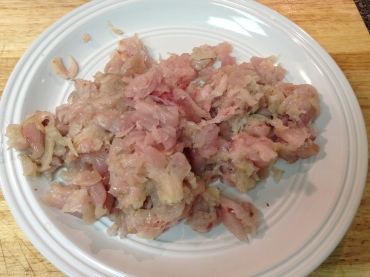
4. Using a spoon, scrape the flesh from the skin of the filets as well as off of the remaining fish bones. You ultimately want all the meat separated, without bones or skin. Be careful of small bones! You don’t want any bones in your fish paste!


5. Place all the flesh on a cutting board and season with salt and white pepper. I used 3/4 of the teaspoon of salt and about 1/2 teaspoon white pepper.


6. Add the approx. 1/4 teaspoon salt you have left to about 1/3 cup of water and set aside for later use.


7. Using the back of a big chopping knife, begin chopping/breaking up the fish. Keep an eye out for any bones to remove. (Note: if you want to save time you could use a food processor.)


8. The fish will develop a slightly sticky consistency as you continue to chop. Add the salted water bit by bit while chopping. This will make it easier and less sticky.

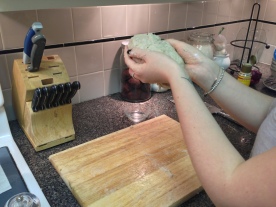
9. Now for the most important part! When your fish is evenly chopped, with no big chunks, you will gather the ball of fish paste and begin the throwing/slamming process. Repeatedly pound the fish paste onto the cutting board. This is the key to making “springy” or “bouncy” fish balls. I’d say I slammed mine about 50 times. Watch for flying fish bits! **


10. When you are done pounding the paste, add a little water to your 1 tablespoon of cornstarch in a small bowl, just enough that it liquifies. Add this to the fish paste and knead until combined well.


11. Your fish paste should be smooth and soft. When you’re finished, wet your hands and apply a little bit of water to the surface of your fish paste ball and you will notice it becomes smooth and shiny. You have done well!


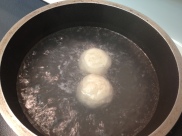
12. You can test out your paste by dropping a spoonful into boiling water. When it floats, it’s cooked! Have a taste. You can add more seasoning, chop or pound more as needed.


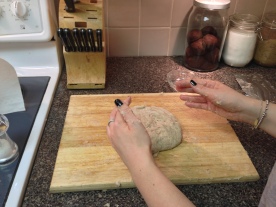
13. To make fish balls, take the paste in your hands and shape into balls. They are usually about a tablespoon of fish paste each.

14. Storage: You can separate your fish paste however you like, and keep in the freezer. If you want to freeze it in fish ball form, I suggest lining a baking tray with parchment paper, place the fish balls in a single layer on the parchment, cover with foil to avoid having your freezer smell like fish and then allow them to freeze in a few hours or overnight. You can then take the fish balls off the tray and keep them frozen in a container or bag of your choice.


**In regards to the “throwing” of the fish paste, I’ve heard people throw 10 times and I’ve heard throw 70 times. It takes practice to make perfect fish paste and also comes down to personal preference. Keep experimenting to master a perfect paste for you!


I hope you enjoy this recipe! It was a fun learning experience and taught me a little more about my own heritage which was really nice. You can always get creative and add extra ingredients to your fish paste before cooking. Adding ingredients like green onions or ham are more common, but let your imagination run wild! I’m sure you can come up with something tasty!


Credit: https://thishungrykitten.com/2013/11/14/homemade-chinese-fish-balls-the-way-they-should-be-made/ 

13 February 2019

Plant Tissue Culture Techniques: 6 Methods & Protocols

Plant Tissue Culture is the process of growing an isolated plant cells or organs in an artificial nutrient media outside the parent organism. In other words, it is an in vitro culture of plant cells or tissues on artificial nutrient media under aseptic conditions, in glass containers.

This is a technique by which new plants can be raised on artificial nutrient media by use of plant parts or cells. These small parts can be pollen, leaves, seed, root tip, embryo etc.

Since all the above organs or cells contain the same genetic material as that of parent plant, a new plant can be grown.

This capacity of plant parts or cell to grow into a full plant is termed as “toti potency”.
Media for tissue culture: Nutrient media plays an important role in tissue culture. It is very vital for proper and timely growth of cells and their multiplication.

Since nutrient media is the only source of nutrition, it should supply all the basic requirements. These include carbohydrates, amino-acids, minerals, hormones and salts etc at proper proportions. It should be sterile and be non-toxic to the tissue or cell under culture.

All the ingredient of the media are to be sterile hence one can use autoclave or membrane filters based on their thermal resistance power. Tissue culture media preparation should be done in aseptic rooms and conditions.

Inorganic elements: Macro elements:

Potassium supplement: As KCl or KNO3 or KH2PO4.
Calcium supplement: CaCl2.2H2O, Ca (NO3)2. 4H2o.
Magnesium source: MgSO4.
Phosphorous source: NaH2PO4.H2O, KH2PO4, NACl.
Micro elements:
manganese supplement: MnCl2,
Zinc source: ZnSO4.
Copper source: CuSO4.
Aluminum source: AlCl3.
Other micro nutrients like bismuth, molybdenum, nickel are also added.

Organic compounds:

Carbon source– Sucrose/glucose 2-4%

Vitamin source:
Thiamin HCl (o.o1mg/lit)
Pyridoxine (0.5mg/lit)
Nicotinic acid (o.5mg/lit)
Folic acid (0.5mg/lit)
Pantothenic acid (0.5mg/lit).
Amino acid source: Arginine, aaspartic acid, glutamic acid, glutamine, methionine.

Growth hormones:
Indole-3 Acetc acid.
Napthalene acetic acid.
2,4 D (2,4-dicho phenoxy acetic acid).
Kinetin, zeatin, benzyl adenine.
coconut water, yeast extract, malt extract, casein hydrolysate.
Also one can include activated charcoal to adsorbs impurities from media. pH of 5.2 to 5.6 is best with temp of 25c.
Tissue culture equipment like Complete air conditioned lab, laminar air flow, autoclave, BID incubators, Shakers are also needed.
For more, refer; Plant Tissue Culture: Techniques and Experiments.

Steps in tissue culture:
 Plant Tissue Culture Techniques at home 

1. Tissue or cell of an interesting plant is selected and sterilized (disinfected) by mercuric chloride or alcohol.
Sterilization of cells: The cells taken for tissue culture are to be surface sterilized. This helps the cell wall and tissue surfaces to be free from any bacterial or fungal infections.  Care should be taken during their handling, transfer etc. to keep them free from infection.
2. Then tissue is placed in media in a conical flask or volumetric flask and incubated with proper oxygen supply and right temperature.
Oxygen supply: Since tissue has no direct mechanism to take up oxygen, oxygen supply has to be provided. The gas should be free from contamination and also aseptic. The rate and pressure of flow of gas into the chamber of tissue culture should be optimal.
3. The tissue or cell multiplies and then forms plant-lets.
4. This can be transplanted to green house. Tissue culture plants are highly sensitive to tolerate natural environment conditions. They have to be slowly adopted to normal atmosphere. So first they are to be grown in green houses.

Tissue growth curve:
When a cell or tissue is incubated in nutrient media, it shows phase different in growth. There are four phases of tissue growth and when a graph is plotted with growth versus curve, we obtain tissue growth curve. This growth curve has
a) Lag phase: The phase of adjustment to new environment. Here the cells just grow in size but don’t multiply.
b) Exponential phase (log phase): Here the cells multiply profusely and grow in numbers. This is a useful phase to produce bi-products in large quantities.
c) Decline phase: Here the multiplication of cells slows down. Nutrients are exhausted.
d) Stagnant phase: The cells here remain in fewer numbers without further multiplication. This is due to lack of nutrients, accumulation of toxins etc.

Plant Tissue Culture Techniques

There are mainly two major techniques in plant tissue culture.
a) Static culture (Solid-agar Medium): It can also be called as callus plant tissue culture. In this procedure, the plant-tissue is grown on solid agar medium and always gives rise to tissue mass called a callus. This callus culture technique is easier as it is easier and even convenient for initial maintenance of cell-lines, and also for carrying out the investigation studies related to organogenesis i.e organ formation.
b) Suspension cultures (Liquid media): Here the cell aggregates, or even single cells are grown in liquid culture. The cells are kept suspended by using agitators/shakers/ impellers. The actual growth rate of the liquid-suspension cultures are much higher in comparison to those grown solid-agar medium. Besides, this technique provide much superior control over the growth of biomass as the cells are always surrounded by the nutrient medium completely.

Types of suspension culture:
1) Batch suspension cell culture: Here the cells or tissues are grown in a fixed volume of nutrient medium. Once the cells reach exponential phase, the  entire culture is replaced with new one. It is closed type of culture.
2) Continuous suspension culture: Here there is continuous addition of nutrition media. The dilution rate is such that an equivalent volume of media is removed out proportional to the in flow from top. The cells are always kept in exponential growth phase.
I) Open type: Here the system is kept continuous with constant addition and removal of cultured cells.
II) Closed type: Here cell proliferate till completion of exponential phase. Then there is fresh addition of nutrient media & culture media.

Credit : https://www.studyread.com/plant-tissue-culture-techniques/ 

Tissue Culture - Propagating Plants

Home Plant Tissue Culture

Surprisingly it can be fairly easy to produce some plants through tissue culture in the average home. Expensive laboratory equipment and chemicals are replaced by common items repurposed to the task.

Saintpaulia, ferns, orchids and a number of other plants lend themselves to easy home tissue culture production.

While you can order a kit the best method is to attend a Home Tissue Culture Workshop where you are taught by an expierenced instructor. There is also an online group that specializes in home tissue culture.

We facilitated such a workshop in Broward County, Florida on November 5, 2011 and wish to publicly thank the University of Florida Research & Education Center in Davie Florida 33314 for their classroom and assistance - without them the workshop might not have happened. We also thank the 25 attendees who brought plants, questions and a willingness to learn a fascinating method of plant propagation.


Brief How & Why of Home Tissue Culture

by Bob G. Cannon II


While in the process of setting up workshops for plant tissue I have been asked a lot of questions. Most frequent are what advantage TC might have and how it might be done without spending a fortune on a laboratory. What follows attempts to offer answers to some of the questions I have been asked.

First let me say what Plant Tissue Culture (PTC, TC) is not. It is not against nature and not genetic engineering. It does not have to be particularly expensive or dangerous. Like grafting, gardening and changing the oil in your car you do need to follow some standard directions. Since TC started as an expensive laboratory process, requiring quite a bit of technical knowledge many of the terms used with it stem from this – for example we don’t say the directions for making a TC of African Violet but the protocol for African violet.

Most of us know that some plants will grow from cuttings – TC, in it’s simplest is using a plant’s ability to reproduce from cuttings on a very small piece of the plant. Plants from TC are identical to the parent plant, just like an airlayer or cutting. When you make an airlayer or cutting of a plant a Botanist or Horticulturist will usually call this plant a clone of the parent, TC plants are clones of their parent plant. In the garden we snip off a 2-foot branch and thrust it into the ground and it may grow. With TC we might take a part of the bud at the tip, or a part of a leaf and use it to produce a large number of new plants. Since the ‘cutting’ is very small special care needs to be taken to keep it alive long enough to make new plants. Grasshoppers and cutworms are not so much the enemy as fungus and other diseases.

Why Plant Tissue Culture?

Most new plant varieties come about because someone planted a seed and it grew into a plant whose fruit (or root or leaves) were different in a desirable way. Sometimes new varieties come about due to a mutation that occurs in a plant. (Pink grapefruits started this way, from a single branch on one tree in an entire grove of standard white grapefruit).

If a seedling variety is different enough someone will want to propagate it. It might be propagated for profit of to just spread the new plant out into the world. TC is useful here in that you can get a large number of identical plants quickly, once you figure out the protocol.

As an example: I like Hippeastrum (Amaryllis) and sometimes cross-pollinate them. Suppose I got one that had a rich blue flower, how would I propagate it to make enough to sell? I could grow the bulb and then save the offsets and cut the bulb in hopes of building up some stock over time. To get 10,000 clones would take years. I could also use TC to produce my new bulbs. With TC I would have my new bulbs much quicker. Another reason to use TC is preservation of endangered plants. Using a part of the last known living xyz plant thousands of new plants can be produced. These can then be planted in the natural range of the endangered species and spread throughout the world.

Some plants grow naturally and produce only male or female flowers, these plants are called dioecious and must have both sexes to produce seed. I know of a few plants where there is only one known sex living. These plants must be produced by cuttings or layers, as no seeds are possible. TC is also a good alternative. The most popular plant I know that is found as only one sex are some of the Lady Palms: Rhapis humilis are all male while Rhapis laoensis are all female. You might cross-pollinate them but any plants resulting from the seeds will be a hybrid combining elements from both of the parents.

Here is a last reason to use TC is more difficult to define. It can be fun. FUN? TC can be just as much a fun and rewarding part of horticulture as growing orchids, a home garden or (in my case) rare fruit. I have known people who, being dedicated to their ‘special plants’ spend decades working to grow them. Some spend far more than they will ever get back from their plants – unless you consider the rewards of success. The late William F. Whitman spent decades importing and growing rare tropical fruit that everyone knew would never grow in Florida. He, and other rarefruiters, helped bring new edibles not only to the USA but the world. If you have eaten a ‘starfruit’ or carambola in North America Bill, and a couple of other gentleman (Dr. Robert J. Knight, Morris Arkin) had a hand in putting it on your table. Bill grew his plants for fun, so did Morris.

Some readers may be in the same category of the men mentioned above, either they made plants their only job or their plants were a second job. Said another way — plants became their passion.

The How’s of Tissue Culture

The easiest way to get a plant into TC is to find a lab and hire them to do it. Not much fun in that and it can be costly.

The fun alternative is to set up your own lab. With your own set up you can participate in the joy of producing your own plants. You can work at your own pace, limited only by finance and the growth habits of the plants.

One of the most rewarding setups for the hobbyist and new professional is a home lab. Your home lab might be in a spare room or garage or it can share the space with another function. Carol M. Stiff, PhD has developed a business and an entire course aimed at those who might use their kitchens. Her Kitchen Culture web site, kits and workshops have introduced many to a fascinating new hobby. Some have even gone on to commercial labs or projects. By the way, the Home Tissue Culture Group has available all the special chemicals and equipment you need to start at home. They even sell the book Plants From Test Tubes to customers at cost. Their link is on Carol’s web site.

In a home lab the autoclave is replaced by a microwave or pressure cooker, disinfectants are found at the local store (bleach, hydrogen peroxide) and other lab equipment is improvised or done without. Recycled bottles become glass vessels for growing plants – baby food bottles are especially popular for this. You may also need sugar, baking soda, vinegar, water… Only a few additional things need to be bought that cannot be found in a grocery or drug store.

To grow a plant by TC you first need to find out is someone else has already grown it and published the protocol (directions). If they have, your task is simplified some as you know what worked. (You may still need to make a few alterations to get the best results). If you can’t find a protocol for your species of plant look for one for the same Genus or close relatives. You may be able to adapt one to your needs.

Assuming you have gathered any lab equipment, and found a protocol you have to choose your plant. Just as you would not make cuttings from a diseased plant your TC plant needs to be healthy.

What part of the plant you need depends on several things. Generally if you found a protocol that used material from a leaf you would not use material from the roots – unless your goal is to see if you can produce plants from the roots. Most of the time the plant donates a small portion and is not adversely affected. Most plants can lose a leaf or tip without great damage. You may already have pinched off a leaf from an African Violet, Begonia or Peperomia to use to start a new plant; the parent hardly noticed the loss. There are exceptions, banana being one.

To get good material for TC with a banana you generally dig up the corm and cut off the growing point. Preferably you use a “pup” for tissue culture rather than destroying the mother plant. This is cleaned, and trimmed down several times.

I have often taught that in the grove or greenhouse cleanliness is extremely important. In TC it is paramount and it is worth quoting John Wesley twice: 'Cleanliness is indeed next to godliness' - 'Cleanliness is indeed next to godliness'! You need clean plant material, clean growing areas and might even take a bath and put on clean clothes before you start a TC project. Anything you get into a culture is contamination and contamination is the main reason TC fails.

Clean plant parts, clean equipment, clean air, clean you. To get clean air many use a makeshift glove box or clean box, no need for a laminar flow hood. If you have grown orchids from seed you know about a clean box. I have seen them improvised in many ways, including fish tank, and clear plastic over collapsible PVC pipe frames.

The next step is to place your prepared plant material onto the growing medium. Growing medium? Uh oh what is this? Chances are you have planted seeds in a seed mix or cacti in a cactus mix, medium is just the TC term for the same thing – a specialized mix that gives the plant material the best chance of survival and growth. To give the details of growing this into tiny plants or explants is beyond the scope of this article and one of the reasons I suggest taking a workshop.

You can’t really take the science out of tissue culture, but you can simply the process and methods so that you do not need an expensive lab and a Ph.D. for success. If you want to give TC a try you may want to know some of these terms below.

PTC is done on various plant parts including:
Buds
Stems
Leaves
Roots
Corms
Bulbs

Each plant part has special requirements and may have its own method name. For example TC using a bud (growth point of a plant) is a meristem culture.

Medium — what you grow the plant material in. Mediums are frequently given exotic sounding names (usually after the people who first made them) the most popular seems to be Murashige & Skoog (MS) which is modified many different ways depending on the plant. The medium contains what the plants need to use as they grow, much like garden compost.

When you grow a tiny developing plant in a culture it is called an explant. This is just another stage of growth in the plants life similar to growing fern from spore and watching it pass from gametophyte to sporophyte.

Protocol — the directions methods or techniques used to TC a particular plant. Some protocols can be difficult to locate. A good place to start is with someone with wide experience. If all else fails, or you want to save some time, drop Carol an email and she probably has a reference or knows someone who has cultured your plant.

Botanical Name, Latin Name or Binomial — the scientific name of the plant. When looking for information about a plant on the Internet, or in research publications it sometimes is better to use the Latin name for a plant to avoid confusion. The two parts of the name are the Genus and species. (This is reversed from peoples names in North America as the species name is equal to a given name). An example might be in searching for a protocol for African violet. Many different flowers have daisy as a part of their common name and the protocol that works for one may not work for another. Some countries may not even refer to the plant by the common name. The scientific name you want is most likely: Saintpaulia ionantha or Saintpaulia spp.

Many plants are named after their discoverers and African violet is named after a German Baron, Walter von Saint-Illaire, who discovered the plant in East Africa.

If you cannot find a protocol for the species or Genus (it is always capitalized) sometimes looking for members of the same Family helps. African violet is in the Gesneriaceae – in most of my botanical books family names in all caps to emphasize their importance, GESNERIACEAE. Almost all family names end in aceae or ae. (SOLANACEAE = tomatoes, peppers, potatoes, tobacco; PALMAE = coconut, jelly, ivory, parlor palms). A plants scientific name is forever – unless it gets changed! This same basic system is used for all living things. (It was formalized by a talented Swedish man (Botanist, Doctor and Zoologist) in the 1700’s. His name was Carl von LinnĂ© although you may see it as Carl Linnaeus. Using his system he Latinized it to: Carolus Linnaeus, which also appears. A full copy of the code can be found at the site below. It is NOT light reading: http://www.botanik.univie.ac.at/iapt/s_ICBN.php

One last thing on using scientific or proper names: Scientific names are nothing to be ashamed of, it is not putting on airs to use them. BUT if you insist on using scientific names exclusively, and correct all friends who do not share your enthusiasm you risk leading a solitary existence. Sometimes it is best to let a peach be a peach and not Prunus persica!

Can Plant Tissue Culture create problems?

Yes, if misused. And almost anything can be misused. In the case of home PTC the chances are not very high and the techniques and chemicals used in a home lab are mostly already in your home. Some commercial and other labs combine it with genetic engineering and a lack of proper safety protocols. I believe that this is due to a shift in research from academic control to profit motive control. You are free to disagree but I note that gene modified corn, soy and papaya contaminate several growing areas. Understand that it is a lack of proper safety protocols and not the act of genetic engineering in and of itself that is causing concern. Technically when you do any selective breeding you may be practicing genetic engineering. It is a very political area.

So, is Plant Tissue Culture for you? Do you think it might be fun or want to give it a try for the possibilities it opens up? If so, I suggest you consider taking a workshop and the best one I know of is given by Carol Stiff. I am in the process of trying to set up one now, and may try for others in the future.

Some Links:

First Page

Our instructor is Carol M. Still, PhD., President & Founder
Kitchen Culture Education Technologies, Inc
www.kitchencultureEducation.org

You may contact her direct at: carol@kitchencultureEducation.org

Rare Fruit Site: www.quisqualis.com

Information on any TC workshops I may be organizing or know about: Carol's site and watch for links and information here at: www.PropagatingPlants.org

08 February 2019

The Myth in the Mix - Lime : Sand

The 1:3 ratio of lime to sand

Gerard Lynch


Mortar samples
Top, centre, a sample of some 'screened' dry-slaked, 1:3 quicklime:sand mortar with, below it in the centre, a fully mixed and matured sample of mortar made from the very same mix, but now to a ratio of 1:2 slaked lime:sand. On either side are four samples of historic mortars from the 17th and 18th centuries for comparison. 

In recent building-site history, mixing mortar has become a job for the general labourer, despite often being unqualified and poorly skilled. And yet the mortar is, and has always been, utterly central to masonry construction. Inappropriate mixes mar the appearance of the best-built walls and often compromise the integrity and durability of a structure. 

Lime mortars were the norm for centuries, and the secret of the perfect mix for any given situation was passed from father to son and from craftsman to apprentice over generations; the techniques also varied considerably across the country to suit the nature and performance of predominantly locally-sourced materials. There were few textbooks and no formal training. It was a matter of tradition and instinct supplemented by generations of experiment and sound experience. 

This chain of knowledge was severely interrupted by the First World War and the near-universal adoption thereafter of stronger, faster-setting and consistent (but not always appropriate) cement-based mortars. To a large extent, today's craftsmen have had to rebuild that knowledge base from scratch. But what if we have placed too much trust, and not enough understanding, in surviving texts, rather than analysing the sound evidence of centuries-old mortars? 

Analysis of historic mortars reveals that the types of limes and sands and their mix ratios varied considerably. Richard Neve's book The City and Country Purchaser and Builder's Dictionary, which was published in 1762 (and in facsimile by David & Charles, 1969), illustrates this (see pp 198-199) with examples of varying mortar ratios used in and around London, often in different parts of the same building for the footings, inner and outer flank walls, and with the best reserved for the outer leaf of the facade. To a large degree, the type of lime and sand and the need to obtain a workable mix determined these ratios.

With the lime revival of the past 25 years (which for many years was primarily based on the use of pure, non-hydraulic lime prepared as a putty mixed with a well-graded aggregate) it is interesting to note that there has been an emphasis on the common use of a 1:3 lime:sand ratio based essentially on a measurement of the 'voids by volume' within a measure of dry sand. It is generally accepted that this measurement provides a good indication of the volume of lime binder required to ensure a coating of lime around every grain of sand, and technically it is quite correct. 

The method used to measure the voids involves half-filling a graduated laboratory flask with an oven-dried sample of the specified sand, and then carefully pouring clean (potable) water into it from another identical graduated flask until all the voids are filled and the surface of the water rises level with the surface of the sand. The volume of water required to fill all the voids in this volume of sand can then be calculated by subtracting the volume of water left in the water flask from the volume it contained at the start, this being determined as the minimum volume of lime binder required for producing a good mortar. 

Typically this is found to be one-third of the original volume of the water and hence the ratio is determined as 1:3. But it is not correct to believe that this provides all the answers, and nor does it reflect the reasoning by which the 1:3 ratio was historically specified.

ONE PART SLAKED LIME OR ONE PART QUICKLIME?

It is vital to understand that, until the Second World War, a majority of limes were still prepared from freshly burnt quicklime delivered to site, as opposed to ready-to-use slaked putties, which would have been extremely heavy to transport, or bagged dry-hydrates. For general mortars the quicklime was then usually slaked to a crude powder (technically, a dry-hydrate) on site. One of the most popular methods to achieve this was to place a one-third measure of quicklime broken down to the size of nutmegs within a cubic yard of ringed sand, and then apply the minimum of water necessary to slake it, before quickly drawing the sand over it as it both heated and broke down in slaking. After slaking was completed the pile would be turned over dry to fully integrate the sand and lime. One option was then to add extra water to bring it to the working consistency of mortar ready for immediate use. Alternatively, the dry mix could then be thrown with the shovel through a large inclined 5mm (¼") meshed screen to remove large inclusions before mixing it with water, thus producing a top-quality 'front mortar' that was generally reserved for facade masonry.

The important thing to note here is that the lime used in the ratio of 1:3 was not prepared slaked lime (calcium hydroxide) but unslaked quicklime (calcium oxide), a fundamentally different substance in several respects, including volume. This vital point has frequently been overlooked and has led to misinterpretation of a great many historical mortar mixes based on original documents recording mortar ratios, or on those recorded within old craft books. 

A simple but very good example of this is to be found in an architect's private site book, for an entry dated 1927 on preparing lime mortar as follows: 'Mortar: Lime 1, Sand 3. Lime: slack [slake] with water and then cover with sand. After lime is thoroughly slack, screen through upright screen and then mix with water to desired consistency'. 

The proportions used by this architect for mixing quicklime with sand would not apply to a mix made with hydrated lime (whether hydraulic or non-hydraulic) because all quicklimes increase in volume when they are slaked. The amount of increase varies according to the type and class of lime but typically this is between 60 and 100 per cent. Therefore the resultant lime:sand ratio for the finished mortar is always more lime-rich than the originally-stated ratio. 

That is why, under analysis, the majority of historic lime mortars are not commonly found to be 1:3 but typically vary between 1:1½ and 1:2, just as the original mortar makers and craftsmen intended. This is borne out by extensive analysis carried out over many years by The Scottish Lime Centre Trust. (At the last count the organisation has analysed around 4,500 historic mortar samples, approximately 80 per cent of which were from Scotland, 10 per cent from England with the remaining 10 per cent from various other countries.) The average lime:sand ratio on the organisation's entire database of historic mortar samples is around 1:1½. 

The 1:3 quicklime:sand ratio suited most general building sands. However, sometimes builders had to use a naturally fine and more uniform local sand, not the ideal well-graded building sand, but one that demands an increased lime content to make good mortar. Then the craftsmen simply adjusted the quicklime content accordingly. A good example of this was discovered during archaeological works to the external brick fabric of Aspley House, Bedfordshire (late 17th-century and enlarged 1745). The Scottish Lime Centre Trust, on behalf of the writer in his role as historic brickwork consultant, undertook detailed analysis of several samples of original mortar, which is known to have been made using the fine sand obtained from within part of the curtilage of the property, and mixed with the local (Totternhoe) feebly hydraulic grey chalk lime. These mortars had been used for both the mansion brickwork and on a long and very high garden boundary wall to the rear of the property. The main house brickwork mortars, from both phases of construction, were to identical ratios of 1:1.4, but interestingly, the mortar for the garden wall brickwork was to a ratio of 1:0.7, revealing that the bricklayers had simply doubled the ratio of lime to sand as a logical and pragmatic way to gain additional strength and the weathering capabilities deemed necessary for this most exposed of elements.

BEST PRACTICE

Misconceptions concerning the traditional method of gauging quicklime to sand have contributed to some mortar failures based on a volume ratio of 1:3 with ready-to-use lime, particularly where inexperienced personnel working with lime putty have not realised that a measure of lime within a ratio might not be one full unit of lime. Lime putty contains a sizeable percentage of water; thus reducing the actual binder content within that ratio further. It is essential to discuss with the lime supplier the best method to achieve the specified volume ratio when lime putty is the specified binder. Generally speaking, good mature putty (four months old as opposed to fresh putty) will have a relative bulk density of 1.350kg/m3, will weigh approximately 1.45 kg/litre, and will contain 640-650g (equivalent dry weight) of lime per litre, or 470-480 g/kg. 

Non-hydraulic and hydraulic limes are both available today as dry hydrates. The former, as 'high-calcium' lime (generally marked 'CL90' to indicate that it contains 90 cent calcium lime), is usually marketed as builder's lime, and is primarily intended as a plasticiser in cement:lime:sand mortars (1:1:4 or 1:1:6 for example) for modern masonry construction. This processed lime is not, however, a good substitute for traditional non-hydraulic lime putty or for use on traditionally constructed buildings as it does not possess the same working characteristics as traditionally slaked non-hydraulic lime putty. It is not intended for lime:sand mortars and cannot be relied on to meet the strength and durability performances required. 

Modern dry-hydrated hydraulic limes, marketed as 'natural hydraulic limes' (NHL), are classified in three ascending numerical grades of compressive strength at 28 days, expressed in Newtons per millimetre squared, as NHL 2, NHL 3.5 and NHL 5. These grades are broadly equivalent to the old classifications of 'feebly', 'moderately' and 'eminently' hydraulic limes respectively. When gauging natural hydraulic limes with sand to make a mortar it is important to understand that dry hydrates have different relative bulk densities from sand (as do all powder binders) and therefore should ideally be accurately weighed. As weigh-batching is rarely practised on-site, most lime suppliers specify volumes of sand (usually to the nearest 10 litres) per full bag of NHL.

It is also important to remember that damp sand increases, or 'bulks', in volume (the amount being dependent on sand grading and moisture content), whereas saturated and bone-dry sand have identical volumes. Allowance must be made for this when measuring the sand, so it can then be accurately volume batched with the lime to the specified ratio. Again it is important to discuss this and agree the correct procedure with the lime supplier.


Recommended Reading

  • Stafford Holmes and Michael Wingate, Building with Lime: A Practical Introduction, ITDG Publishing, London, 2002
  • Gerard Lynch, 'Lime Mortars for Brickwork: Traditional Practice and Modern Misconceptions', published in two parts, Vol 4 Nos 1 and 2, The Journal of Architectural Conservation, Donhead, Shaftesbury, 1998